Tuesday, June 17, 2014

Paradise...Lost then Restored

We have been in Gulf Shores Alabama at the Bella Terra RV Resort. Bella Terra is an upscale Class A Motorcoach resort just inland from the beautiful white sugar sands of the Gulf of Mexico. I dedicated a full page spread on this resort a few weeks ago. On April 30, 2014, Mother Nature paid us a visit and boy was she pissed!....we received 24" of rain in a 12 hour period. Needless to say our park and most of the surrounding area was inundated with water. While most folks survived the ensuing flood waters unscathed, several of us weren't so lucky. We lost two coaches, a Prevost and a Newell, a 2014 Porsche Turbo with 900 miles on it and our beloved HHR. All were considered total losses by our respective insurance companies. As I've said many times, when man challenges Mother Nature, we tend to lose every time. The good news is that we were able to pull together and have the park back in pristine shape within 2 days. Here are some pictures:


This picture was taken the day before from outside our front door. Note the Prevost across the lake...that's the blue/silver bus just to the left of the fountain.


This is what we faced when we looked out the next morning. Actually, I was up most of the night keeping the air up in the coach to keep us above the rising waters.


You might ask why we didn't simply fire up the coach and move to higher ground. Well...with the HHR parked in front of the coach, we couldn't move the coach without moving it. With the electronics submerged, it would not start and we couldn't take it out of park to manually move it. so we were stuck.


I had been working on my computer and Debi had been watching TV. We listened to the steady rain falling but didn't think it was as bad as it was. Jasmine came to me to go out around midnight and as I let her out, she jumped out into a lake, swam around and came right back in. The water was over the top step and almost to the door sill. My immediate response was to start the coach and air up the suspension to raise the compartments above the water level.


This is looking west towards the back of the campground. The Prevost is the coach on the left. The water reached the bottom of the headlights. The gazebo in the middle actually has bridges extending from one side of the lake to the other. Both bridges are inundated.


Another shot of the Prevost. He also had his golf cart parked next to the coach and a Harley trike in the gazebo. All three were lost.

I used this coach as a benchmark to judge water levels throughout the park.


A better shot of the gazebo. There are four large seating benches inside this gazebo. However, one was found about a block away and the other three were washed ashore on the far side of the lake.


Our friends, Brian and Bill purchased their lot last year. It's an awesome location right on the point of the western peninsula. That's their place with the casita on the left. About 3/4ths of this picture should be grass.


How about a pool that flows into the lake, or a lake that flows into the pool. We found several fish swimming in the pool. Pretty ugly.

After we pumped out the water, the pool was pressure washed, disinfected, pressure washed again and refilled. It was ready the following day!


As the flood water receded we began the cleanup. Here's a rear shot of the Prevost. The bench in the foreground belongs in the gazebo that spans the lake as seen in the earlier picture.


A closer picture of the gazebo from the far side of the lake. We were fortunate no one occupied this site.


A closer look at Bill and Brians site. Their coach pad is on the left as you can see the electrical pedestal and that's their seating area with firepit that completely under water. This was taken the next afternoon after we had begun pumping the water out of the lake and campground. If you look closely, you can tell how much water has been removed using the Prevost in the background as a water level meter. It's tires were almost submerged.


Another picture taken from Site 349 across the lake and flooded green belt areas.


About now you're asking yourself, how do you quickly get rid of 40 acres of water, 24" deep? Well, you bring in the big guys. Here's one of several trucks called in to supply the campground with huge water pumps to assist in removing the water. Think seven pumps moving about 5,000 gals of water per minute!


Almost two days later the pumps were still working their magic. Much of the water was gone and the cleanup could begin. The coach pad, by the way is the one our coach had been parked on. I finally removed the transmission linkage on the HHR and towed it to higher ground. Once removed, I was also able to move the coach to a better location. We suffered no damage to the coach, but the HHR was a total loss.

In the middle of this picture stands a turtle. It was a large fiberglass turtle that had floated in the flood waters and ended up here as the water was pumped out. This entire area had been under water.

Saturday, June 7, 2014

Samsung Refrigerator Install

Two years ago, our Norcold 1200LRIM failed. Since it was covered under our extended warranty, we had our choice of replacing the cooling unit with an original Norcold unit or the Amish one. We chose the Amish upgrade since there are no recalls involved with their units. While the Amish cooling unit performed well, IMHO, the Norcold still had its' faults. The one that bothered me the most was the ice maker line. Norcold routes that line up through the cooling unit and it's simply pressed into the feeder tube to the ice maker. A little silicone around this pressed fit and it's supposed to last. Unfortunately ours was prone to failure. When the line slips out of the feeder tube, when the ice maker cycles, the water flows down the back of the fridge and wherever else it wants to go. The 'fix' is to remove the fridge and push the line back into the feeder tube, add some silicone and head on down the road. When it failed for the third time...yes, I'm a slow learner...I'd had enough. Off to the local Home Depot and I purchased a Samsung RF197ACPN. I then contacted a local RV repair shop, Peterson RV in Foley Alabama for assistance. They removed the side front emergency window and slid the Norcold out and the Samsung in, leaving it in my living room. Here's some photos of my installation.


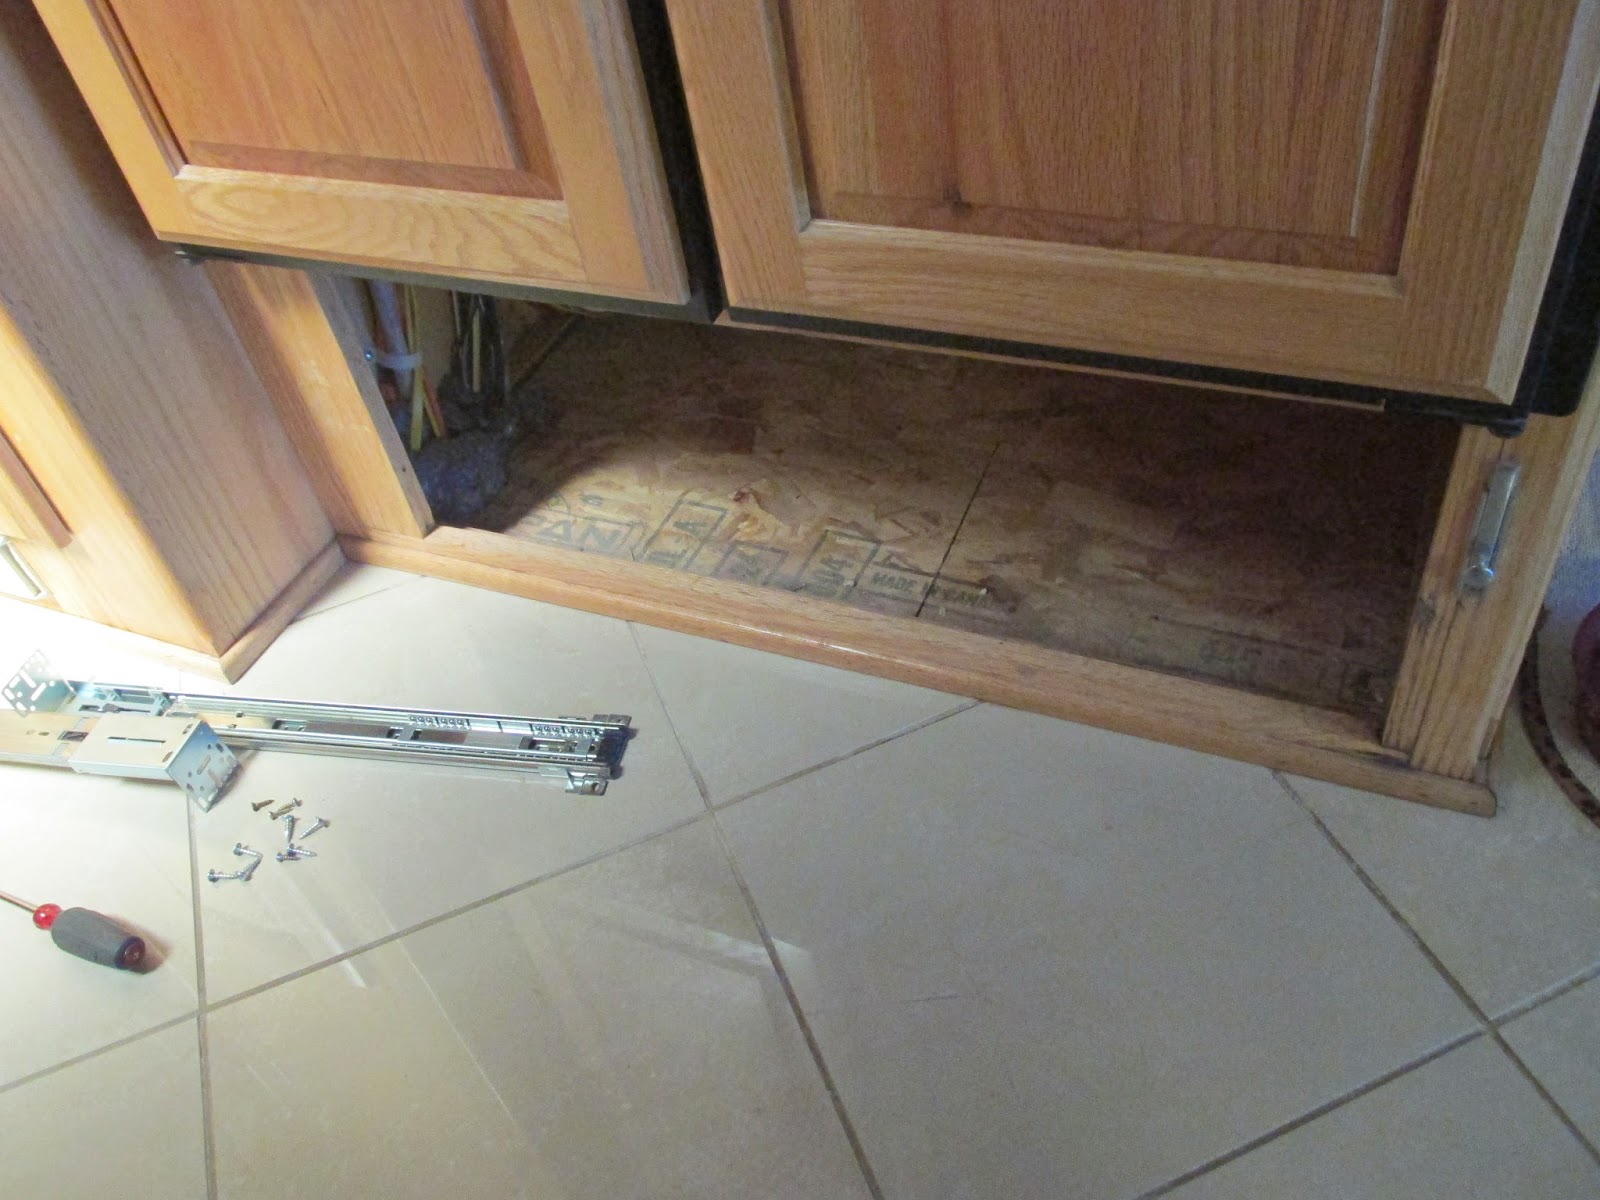
The Samsung is the same width and depth as the Norcold. The height, however is about 6 1/2" taller. Below the Norcold was a drawer. I had to either sacrifice the drawer, remove the top fascia, or a combination of both. Here, the drawer has been removed.


I could have removed the top fascia board and modified it for the extra height of the Samsung. If I modified this board, I could also modify the drawer space underneath and make a smaller drawer. After considerable thought, I decided to simply eliminate the drawer. I felt that if I raised the fridge too much, Debi would have trouble reaching the back of the top shelves of the fridge.


Here's the inside temperature of the Norcold fridge compartment. Holding steady at 40 degrees F.


And the freezer compartment struggling along at a toasty 15 degrees. At least it makes dishing out the ice cream easier....


Once I removed the drawer, I found these bundles of wires. You can see the copper gas line and the blue water lines behind the fridge supports. These wires would be dealt with later.


The Norcold is a 4 door fridge with double doors for the freezer on top and double doors for the fridge compartment on the bottom. As you can see, the fridge is not in the living room slide. My main concern with the Samsung was the door handles. The Norcold handles are flush, while the Samsung's protrude into the room. I was hoping the handles wouldn't interfere with passage through the hallway.


Peterson RV in Foley, Alabama removed the Norcold and put the Samsung in the living room for me. I wanted to do my own install, not only to keep the cost reasonable but to make sure it was installed to my satisfaction. I guess I'm a little OCD on some things.


This is the fridge cavity that must be modified. You can see the gas line on the bottom, and the water line on the top. The electrical outlets are on the wall on the right side of the opening. The floor that the Norcold sat on has been removed and the supporting structure must now be removed as well.


Here you can see the back wall of the fridge cavity. The wires at the top are from the four muffin fan modification I had done to help the Norcold perform better in high humidity locations. I decided to keep these fans in place but now that I have access, I can clean up the wiring etc. I decided to keep the insulation on the left side and remove the insulation on the right. Remember the previous wiring bundles? The insulation will protect and keep those wiring bundles in place. The A/C outlets will be relocated and I decided to leave the rear support brackets in place so the Samsung would have some 'breathing' space in the rear.


The supporting wooden structure has been removed so now it's time for clean up and begin the job of reconstructing the new floor for the fridge. It must be strong enough to support the Samsung's weight of around 450 pounds, loaded.

I also will tackle the relocation of the A/C outlet, the gas and water lines and the bundling of the muffin fan wiring.


Insulation has been removed from the right side and the flooring has been modified to accept the new support structure. I am going to use 1 1/2" 14 gauge Zinc plated slotted angle iron to support the Samsung.


Floor has been cleaned, wiring rerouted and bundled, and the A/C outlets mounted to the back wall. Since I'm doing this install in a campground, I will remove the gas line at a later date when I can support the coach before crawling underneath to disconnect it from the main gas line.


Support base is in place. I used a sheet of 3/4" plywood over the base of 1 1/2" slotted angle iron. I also moved the water line into the corner and secured it with a strap and a bracket. Once the gas line is removed there will be nothing behind the Samsung. Note the A/C outlets behind the rear support brackets. The wiring on top of that brace is for the muffin fans above. They'll most likely never be used, but they are there, 'just in case'...


Simple view of the 3/4" plywood base and the support made of angle iron. Obviously, not enough room for a drawer to be installed, but we are going to live with it for a bit. I may eventually remove this support structure completely and lower the fridge to the floor. That would allow me room above to put in a compartment.


Looking under the floor base at the supporting structure. That's the gas line at the rear as well as the outside dump hose for the Norcold when it defrosted. I left it in place in case I want to use it for something in the future.

I removed the outside access plate and sealed the openings using black Gorilla tape. This will keep out any bugs and the cold/warm outside air.


I made a dolly using the removed flooring from the Norcold and some wheels bought from Home Depot. The 5" wheels raised the fridge up the the exact height I needed to simply slide the Samsung into it's new home. Once in place, I plugged it in and it worked like a charm. 


An hour after plugging the Samsung in and I'm a happy camper. Beer is cold and ice cream is hard once again.


I removed the rear inspection plate on the fridge and ran two 2 1/2" lag bolts through the rear support of the fridge into the 3/4 plywood base. Once I leveled the fridge, I removed the two front leveling brackets. Using a piece of 1/4" steel, I made two brackets and drilled them to fit in place of the two leveling brackets. Reversing these brackets allowed me to run a 5/16" lag bolt through the front of the plywood base to secure the front of the fridge. It's now secured in the front and the rear so it won't go anywhere while we are in motion.


I was able to find some trim pieces in the Honey Oak at the local Home Depot and finished off the top and both sides of the install.


The final piece has yet to be put in place. The bottom support has to be covered with a piece of oak finished to match our interior. Since I don't have access to a router or the proper tools to finish that off, I'll wait until I can find a local cabinet shop to do it for me. Unfortunately, the removed drawer front is not wide enough to use.

All in all, I'm satisfied with the result. Notice the handles are a non issue. Working alone with only hand tools, it took me a good two days from removal of the Norcold to the finished install of the Samsung. The residential upgrade is one of the best upgrades I've done. It's also one of those head banging episodes where you ask yourself, "Why didn't I do this sooner?"

The cost of the fridge, on sale, at Home Depot was $1100/change. Materials were less than $200. Labor was a good two days but that would be less with proper tools and a workshop. Yes, I would do it again.

Tuesday, June 3, 2014

Bella Terra - Gulf Shores Alabama

We stepped out of our comfort zone a bit and decided to try the work camping experience. For those who don't know what that is, a lot of campgrounds look for couples to assist with a variety of things necessary to keep the campground running efficiently. In exchange for working, the campground provides a camping space usually with full hook ups, wifi, cable and utilities. When we were visiting the Bella Terra RV Resort last year, we were invited to return this year and spend a few months work camping with them. Since we were curious if the work camping experience was something we'd enjoy, we decided to take them up on their offer. Considering Bella Terra is one of the top campgrounds in the nation, we were excited to become part of their team. Here's a look at our digs for the next couple months...


Bella Terra RV Resort opened in 2008 and quickly became known as one of the premier locations in the Gulf Shores region.


It features many amenities including the 6000 sq ft clubhouse pictured above. There is a infinity pool, spa, sauna, fitness room, full kitchen, library and computer room, as well as a massage/therapy room.


There are three types of RV lots to stay on, lakefront, pull thrus and terrace lots. Most of the lots have excellent views of the lake. Fishing is allowed but it is a catch and release facility.


Lot sizes range from 3500 to 4500 square feet. Rental fees vary, but are reasonably priced compared with what this resort offers over nearby properties.


For those wondering why these pictures only show Type A Motor coaches, Bella Terra is restricted to motor coaches only, 15 yrs or newer and longer than 32 feet.


Our site is a spacious end site in Phase two. Phase three has limited construction at the moment so we are surrounded by lots of open grassy area.

I apologize if this sounds like a sales presentation, but we are pleased with this resort and all it has to offer.


Sunset from the infinity pool at the clubhouse !